Using Terraform to Automate Okta SSO Group Access
By using Terraform to automate Okta SSO group management, Okta administrators and DevOps teams can provision their entire organization structure inside Vantage in seconds. In this demo, we show you how.
In this post, we demonstrate how to automate new user and team setup for SaaS applications via Okta and infrastructure as code techniques using Terraform. Organizations will typically have established user groups and permissions in their identity management system. Mapping this structure to new SaaS tools for initial setup can often be chaotic. By using Terraform to automate Okta SSO group management, Okta administrators and DevOps teams can provision their entire organization structure inside Vantage in seconds.
If you are just getting started with Terraform, see our introduction to Terraform and FinOps as Code.
The Scenario: Automate Okta Group Management with Terraform
Your organization just started using Vantage. As the Okta administrator, you have a set of existing Okta groups with users that will need to access Vantage. You want to use Terraform and have these user groups in Okta be reflected in Vantage, with the same group members. You have a CSV file that contains the list of groups you need to manage.
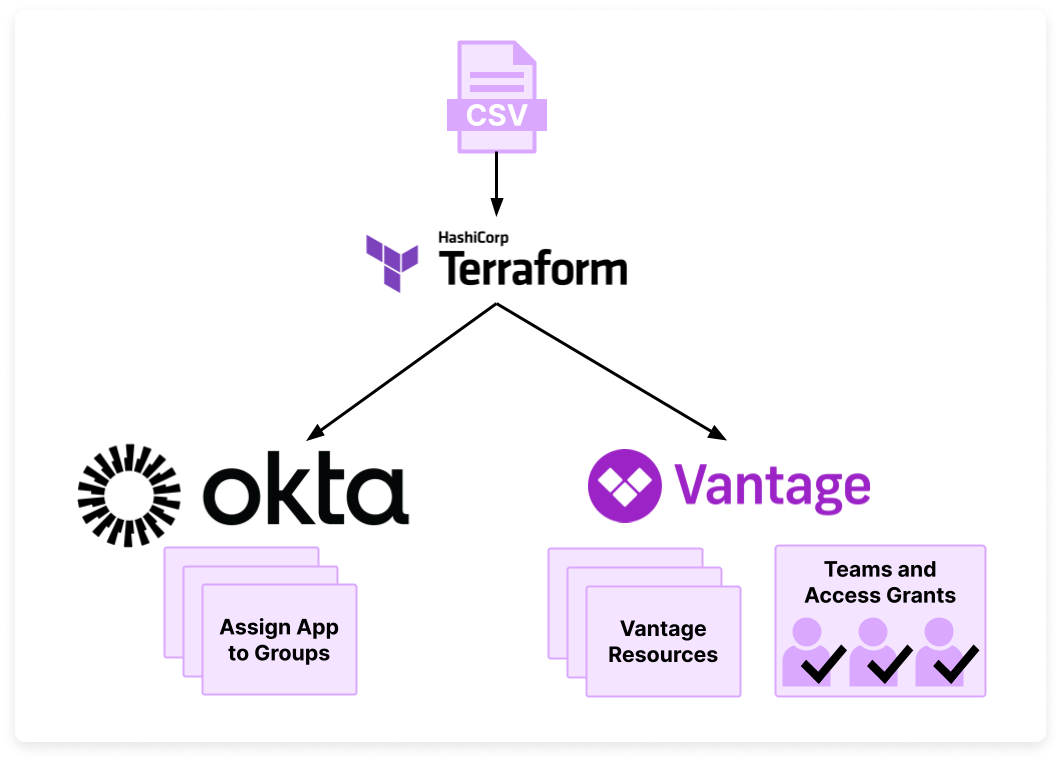
In this demo, we’ll complete the following steps:
- Set up an SSO connection between Okta and Vantage that allows for SSO group mapping
- With the Vantage and Okta Terraform providers:
- Assign the Vantage app to specific Okta groups
- Create teams in Vantage that have the same names as the Okta groups
- Create a set of Vantage Cost Reports and folders with specific access grants tied to each team
When Okta users from these designated groups access Vantage for the first time, they're seamlessly integrated as new Vantage users. They're automatically assigned to a corresponding Vantage team based on their Okta group affiliation.
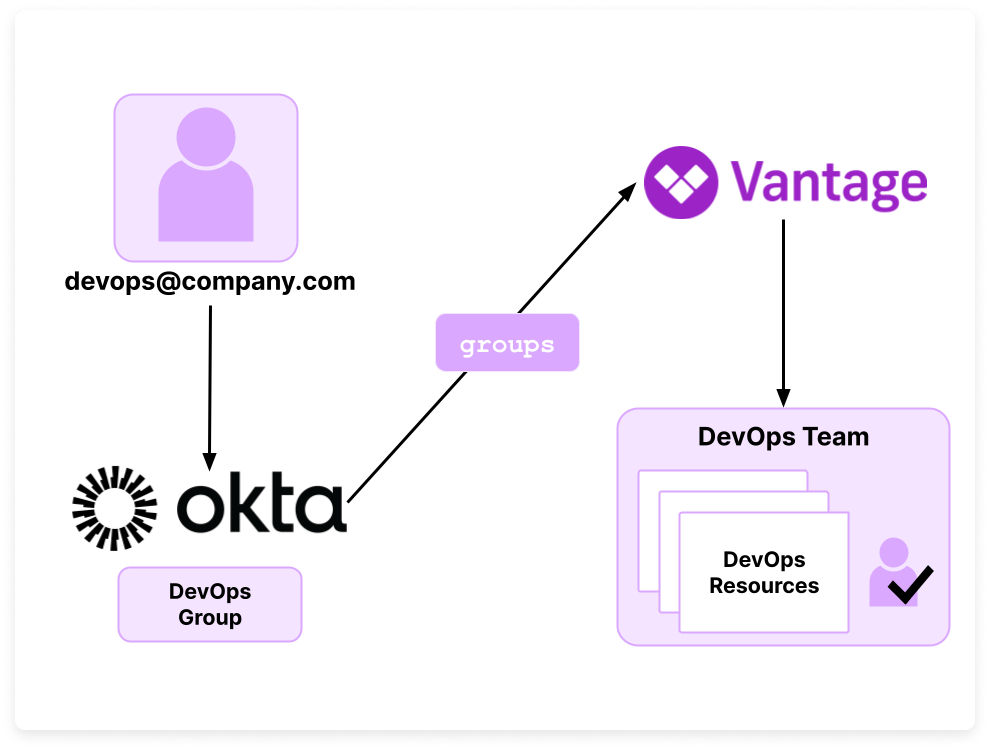
As shown in the diagram below, a DevOps team user logs in to Vantage via Okta. They belong to the DevOps Okta group. The groups field in the SSO payload matches this user with the corresponding DevOps Vantage team. They will also have access to Vantage resources (e.g., folders and Costs Reports) that have explicit access granted to the DevOps team.
Prerequisites: Terraform, Okta, Vantage
This tutorial assumes you have an intermediate knowledge of Terraform and Okta. For Terraform, you should know how to create a basic configuration, have a basic understanding of for_each loops, and an understanding of how to use variables. For Okta, you should know how to navigate the Okta console, set up an application integration, and manage users and groups.
Okta Permissions and Authentication
You'll need to be an Okta administrator for your organization with the ability to assign applications to groups and create a SAML SSO application. See the Okta documentation for details on administrator permissions.
You'll also need to create a service app that provides Terraform access to your Okta account. With the service app, you can create a private key pair as your client credentials. You'll need the service app's client ID and a private key to configure in your Okta Terraform provider configuration. Ensure the service app is granted the following scopes: okta.groups.manage, okta.users.manage, and okta.policies.manage. For more information on how to configure this service app, see the Okta documentation.
You can also reference this Okta workshop for detailed instructions and a video on setting up an Okta–Terraform integration.
Vantage Permissions and Authentication
For Vantage, you will need to be an organization owner with an active account and at least one provider connection. You will also need a Vantage API token with READ and WRITE scopes enabled.
Create a SAML SSO Connection between Okta and Vantage
To create a SAML SSO connection between Okta and Vantage, follow the Vantage SSO documentation. Enable SSO group mapping so you can automatically assign users to Vantage teams that match the name of a corresponding Okta group. Once configured in Vantage, your SSO connection will look like the following image.
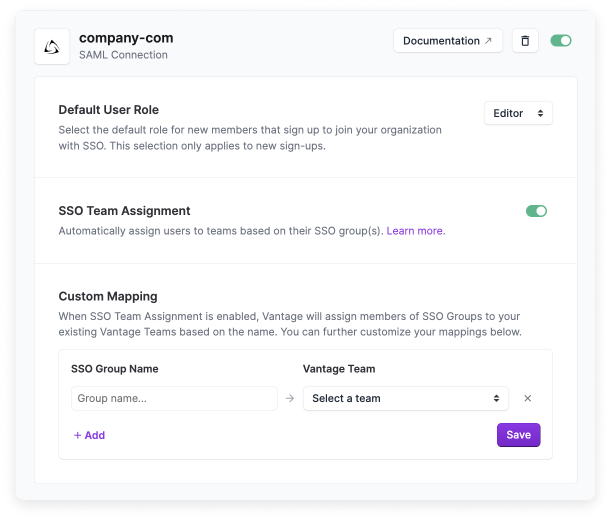
In this example, the organization's domain is @company.com. Note the SSO Team Assignment toggle is enabled. If a user tries to log in to Vantage with a company.com email address, they will be redirected to their organization's Okta login screen.
Using Terraform to Automate Okta–Vantage Group Management
All demo files are also included in the FinOps as Code demo repo.
To begin, create a new project directory and move to it:
Create a Terraform configuration file and call it okta-vantage.tf. Create variables.tf to store some Vantage and Okta configuration values. Create providers.tf to store the provider configurations.
Add the following values to variables.tf.
okta_org_nameis your Okta organization's name, which is viewable in your Okta URL (e.g.,dev-123456).okta_base_urlis what comes after your organization's name in your Okta URL. Typically, this value isokta.com, but it also might beoktapreview.comor something else, depending on your setup.okta_client_idis the client ID for the the service app integration you set up in the Prerequisites section.vantage_workspace_tokenis the Vantage workspace your organization uses (e.g.,wrkspc_12345). Navigate to the Workspace settings screen in Vantage and copy this token.
You'll also need to store the Vantage API token. You can export this token as an environment variable.
Step 1: Set Up the Provider Configuration File
Open providers.tf and declare the Vantage and Okta providers. Declare all the variables stored in the variables.tf in the Okta provider configuration block. (The vantage_workspace_token variable will be used later. No additional provider configuration options need to be declared for Vantage.)
In this demo, we assume you are storing the private_key in the same directory as your configuration and it's called rsa.pem.
Save and run the init command to initialize the configuration and download the latest providers.
Step 2: Assign the Vantage App to Okta Groups
As the Okta administrator, you already know the names of the groups that will need access to Vantage. These names are currently stored in a single-column CSV file, which you can decode and iterate over in your configuration. For this demo, we'll create a local variable that holds the CSV content and another that decodes it. Typically, this file would be in an external location, outside of this configuration.
See the Terraform documentation for more information on working with CSV files.
Open okta-vantage.tf and add the following block.
Next, assign the Vantage app to each of these groups in Okta. You need to obtain the IDs for each group as well as the ID for the Vantage app. You can use the okta_group and okta_app data sources to get both sets of IDs. When calling the okta_group data source, use a for_each loop to iterate over the CSV file and get the group information for each of the listed groups. For okta_app, set the label equal to Vantage to access your previously created application.
Next, use the okta_app_group_assignments resource to assign the Vantage app to each group.
Step 3: Create Vantage Cost Reporting Resources
Add the following resource blocks to the configuration to create cost reporting resources in Vantage. These blocks create a Vantage folder and Cost Report for each team.
The above configuration blocks perform the following actions:
- Create a folder for each team by iterating over the original CSV file. Each folder has the same name as its corresponding team. The
vantage_workspace_tokenvariable defined invariables.tfis needed for thevantage_folderresource. - Each Cost Report will have the name
[Team] Costs(i.e.,DevOps Costs). The Cost Report will be added to the corresponding team folder. - For this demo, the
filteron the Cost Report resource assumes your organization uses resource tagging and has AWS as a connected provider. The filter on the Cost Report uses VQL—or Vantage Query Language—a SQL-like language. Here, the filter creates a report for AWS costs that have ateamtag ofdevops,engineering, orfinancebased on the team.
Step 4: Create Vantage Teams
Now that the Vantage resources are created, you can create teams that exactly match the names of the Okta groups. Remember, when a user logs in to Vantage via Okta, Okta sends the groups parameter in the SSO payload, so Vantage can map the user to a corresponding Vantage team with that same name.
Add a block for the vantage_team resource that uses the CSV list of groups for the team name.
If you were to deploy the current configuration, an Okta user in the list of groups could log in to Vantage via SSO and automatically be added to the corresponding Vantage team. The user could view all folders and Cost Reports previously created, regardless of team.
If you want to take this one step further and lock down permissions to each of the previously created folders and Cost Reports, you can use access grants to allow or deny a Vantage team access to specific folders or reports.
Step 5: Create Access Grants to Lock Down Permissions
This step is optional, and you can deploy the current Terraform configuration without completing this step.
Use the vantage_access_grant resource to grant each Vantage team you created explicit access to their corresponding folder. For example, a user on the Engineering team will be allowed access to the Engineering folder. Because the Engineering Cost Report is inside the Engineering folder, that Cost Report will inherit this same access grant.
Use a for_each loop to iterate through each of the created teams from the vantage_team resource. For team_token, set the value to the token that was generated when the team was created. For resource_token, call the vantage_folder.group_folders resource to access each of the folders that was previously created.
For the last step, you need to remove access from the Everyone team for all previously created resources. In Vantage, the Everyone team is the default team a user belongs to. If you remove access from the Everyone team to a folder or Cost Report, then only teams who were explicitly granted access to that folder can access it. In this case, only Engineering will be able to view and edit the Engineering folder, and so on.
Because you have not interacted with the Everyone team via the current configuration, call the vantage_teams data source to get information for all teams in Vantage.
You need to access the token for the Everyone team to reference when you assign that team a denied grant. Create a local variable that uses a for loop to iterate through the previously received team data and accesses the token for the Everyone team.
In addition, create a local variable for all the previously created folder tokens.
Finally, use the vantage_access_grant resource to create a denied access grant. Use a for_each loop to iterate through the local.folder_tokens variable. Reference the local.everyone_team_token variable for the Everyone team and assign denied access to each folder and Cost Report under it.
Deploy Your Terraform Configuration
Save your configuration and deploy with the plan and apply commands:
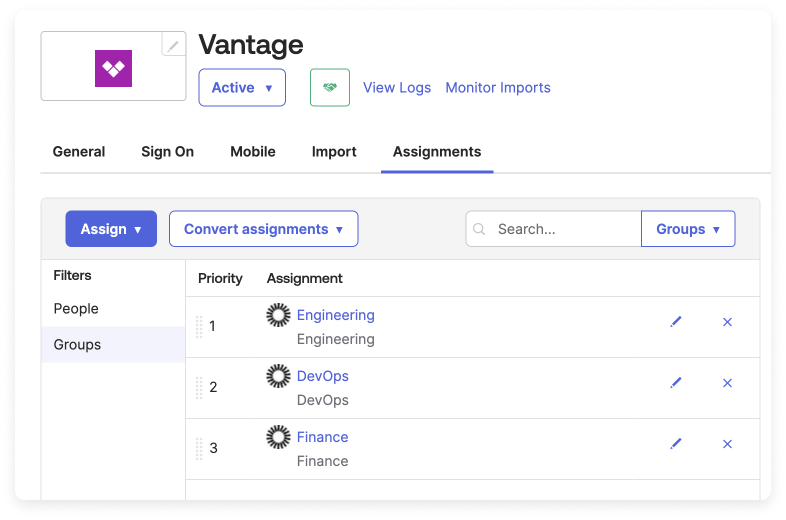
Once deployed, the Vantage app will be assigned to each of the target groups in Okta.
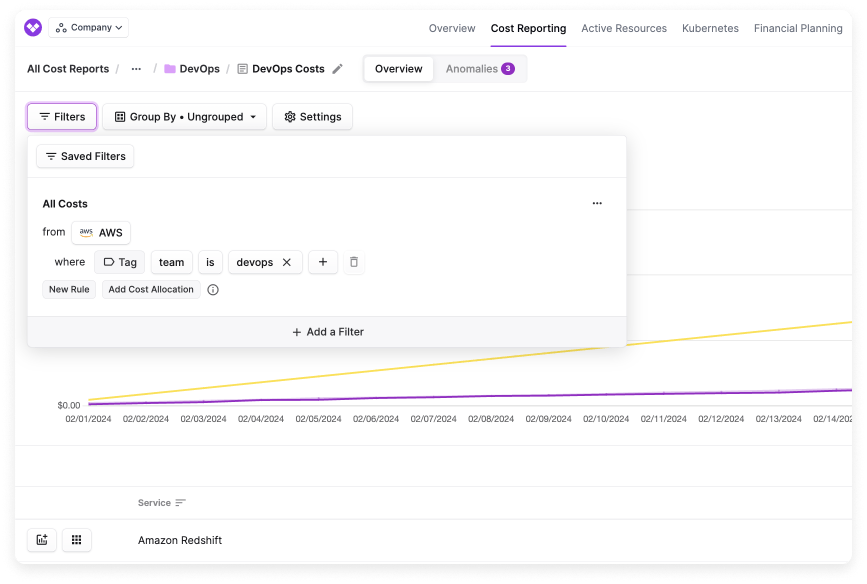
When a DevOps user logs in to Vantage via Okta, they will see only their DevOps report within the DevOps folder, filtered to costs tagged by their team.
Conclusion
In conclusion, using Terraform to automate Okta SSO group access not only streamlines the onboarding process to new SaaS applications like Vantage but also ensures consistent user access across platforms. By seamlessly integrating Okta with Vantage through Terraform, organizations can effortlessly synchronize user groups, facilitate team-based access controls, and enhance overall operational efficiency in managing identity and access management workflows.
Sign up for a free trial.
Get started with tracking your cloud costs.


