FinOps as Code: Terraforming Cloud Cost Management
FinOps has historically involved a lot of manual work to track down costs. By applying Infrastructure as Code techniques, we show a better way.
As cloud budgets continue to grow as the #2 line item behind salaries for many companies, cloud practitioners are becoming more attuned to the FinOps imperative — the need to optimize cloud costs, budgets, and cost allocation. In addition, most major organizations employ multiple cloud service providers, oftentimes having to manually manage and configure numerous cost reports and dashboards.
Enter FinOps as Code, offering a solution to streamline manual cloud cost management efforts. Like its close cousin, Infrastructure as Code (IaC), FinOps as Code empowers FinOps practitioners to automate practices, maintain consistency, and promote collaboration among teams.
The FinOps as Code Toolkit: Terraform
Terraform is an open-source IaC tool, developed by HashiCorp, that automates provisioning and managing your resources in a version-controlled manner. With Terraform, infrastructure definitions are written as code, typically using HashiCorp Configuration Language, or HCL. The benefit of using an IaC tool, like Terraform, is that it enables version control, code reuse, and collaboration — just like traditional software development. When applied to FinOps, you can use Terraform for practices like cost allocation via automated resource tagging as well as creating numerous reports and dashboards.
This blog walks through several FinOps use cases, showcasing how Terraform and other FinOps as Code tools can automate and optimize cloud financial operations. We'll provide code samples and recommendations for how to get up and running with your FinOps as Code practice.
Adopt FinOps Principles for Better Cloud Cost Management
The FinOps Foundation maintains a set of FinOps Principles that "guide the activities of [the] FinOps practice." Integrating the FinOps as Code approach along with these principles not only helps your organization develop a culture of cloud cost mindfulness — it also drives greater efficiency and removes the mundane and manual burden of pointing and clicking through the setup of numerous reports and filters. Considering a few of these principles, we'll dive deeper and discover the power of automation combined with FinOps as Code.
Principle 1: Personal Ownership of Cloud Usage
The Personal ownership of cloud usage FinOps Principle seeks to empower teams to manage their individual cloud cost usage against a designated budget. You can include a Terraform resource within your infrastructure to create a budget, as well as a notification of any budget anomalies that helps the team to immediately recognize when they are nearing budget thresholds.
In the following example, a hypothetical Marketing team uses Amazon Simple Storage Service (S3) to store website media and promotional graphics. They also use EC2 as the compute solution for some marketing analytics systems. They want to set up a monthly budget of $1000 that also alerts the team when they reach a 90% threshold of that budget. Using the aws_budgets_budget Terraform resource, the team can easily configure this budget and ensure they are immediately made aware of approaching that limit.
First, define the aws_budgets_budget resource. Define the limit_amount and time_unit arguments to fit the determined needs.
Add the S3 and EC2 cost_filter argument.
The FinOps Principles also stress that organizations need to "[c]reate, monitor, and improve real-time financial forecasting and planning." In the spirit of timely reporting, you can add the notification argument to send alerts via Amazon Simple Notification Service (SNS).
In the above example, we pass the Amazon Resource Name (ARN) for an already created SNS topic; however, to automate things further, you can use the power of Terraform data sources to dynamically access an ARN that you can then use as a variable within the above configuration.
Principle 2: Accessible and Timely Reports
The Accessible and timely reports FinOps Principle stresses the importance of processing and sharing cost data as soon as it is available. These examples support how convenient and streamlined it is to integrate automation into your FinOps workflow while addressing some FinOps Principles. However, in reality, many organizations are multi-cloud consumers and also work with a number of other cloud service providers. As a result, setting up cost reporting to cover all cloud spend is daunting.
Automate Reporting with Terraform and Vantage
In the following example, we'll use the Vantage Terraform provider (which uses our Write API and VQL) to demo a simplified workflow and architecture for a Marketing department that uses AWS and Snowflake. We'll use Terraform to create a cloud cost management infrastructure that monitors costs for the Marketing team.
All demo files are also included in the FinOps as Code demo repo.
Step 1: Set Up Terraform Directory Structure
For this tutorial, we will use the below directory structure. /vantage_modules will contain all the Terraform resources that we'll call from each module. The root main.tf will contain the modules we create — one for our Snowflake reporting infrastructure and one for our AWS reporting infrastructure.
The goal of this walkthrough will be to create a final dashboard that shows the Marketing team's Snowflake and AWS costs from the past six months, grouped by month.
Step 2: Create Terraform Variable for Workspace ID
Note: Before you use the Vantage Terraform provider, you will need a Vantage API token. You can store your API credentials as an environment variable with
export VANTAGE_API_TOKEN=an-api-token.
First, we'll obtain the Marketing workspace token from the /workspaces Vantage API endpoint. We’ll store this token as a variable within the variables.tf file, in the root of our directory.
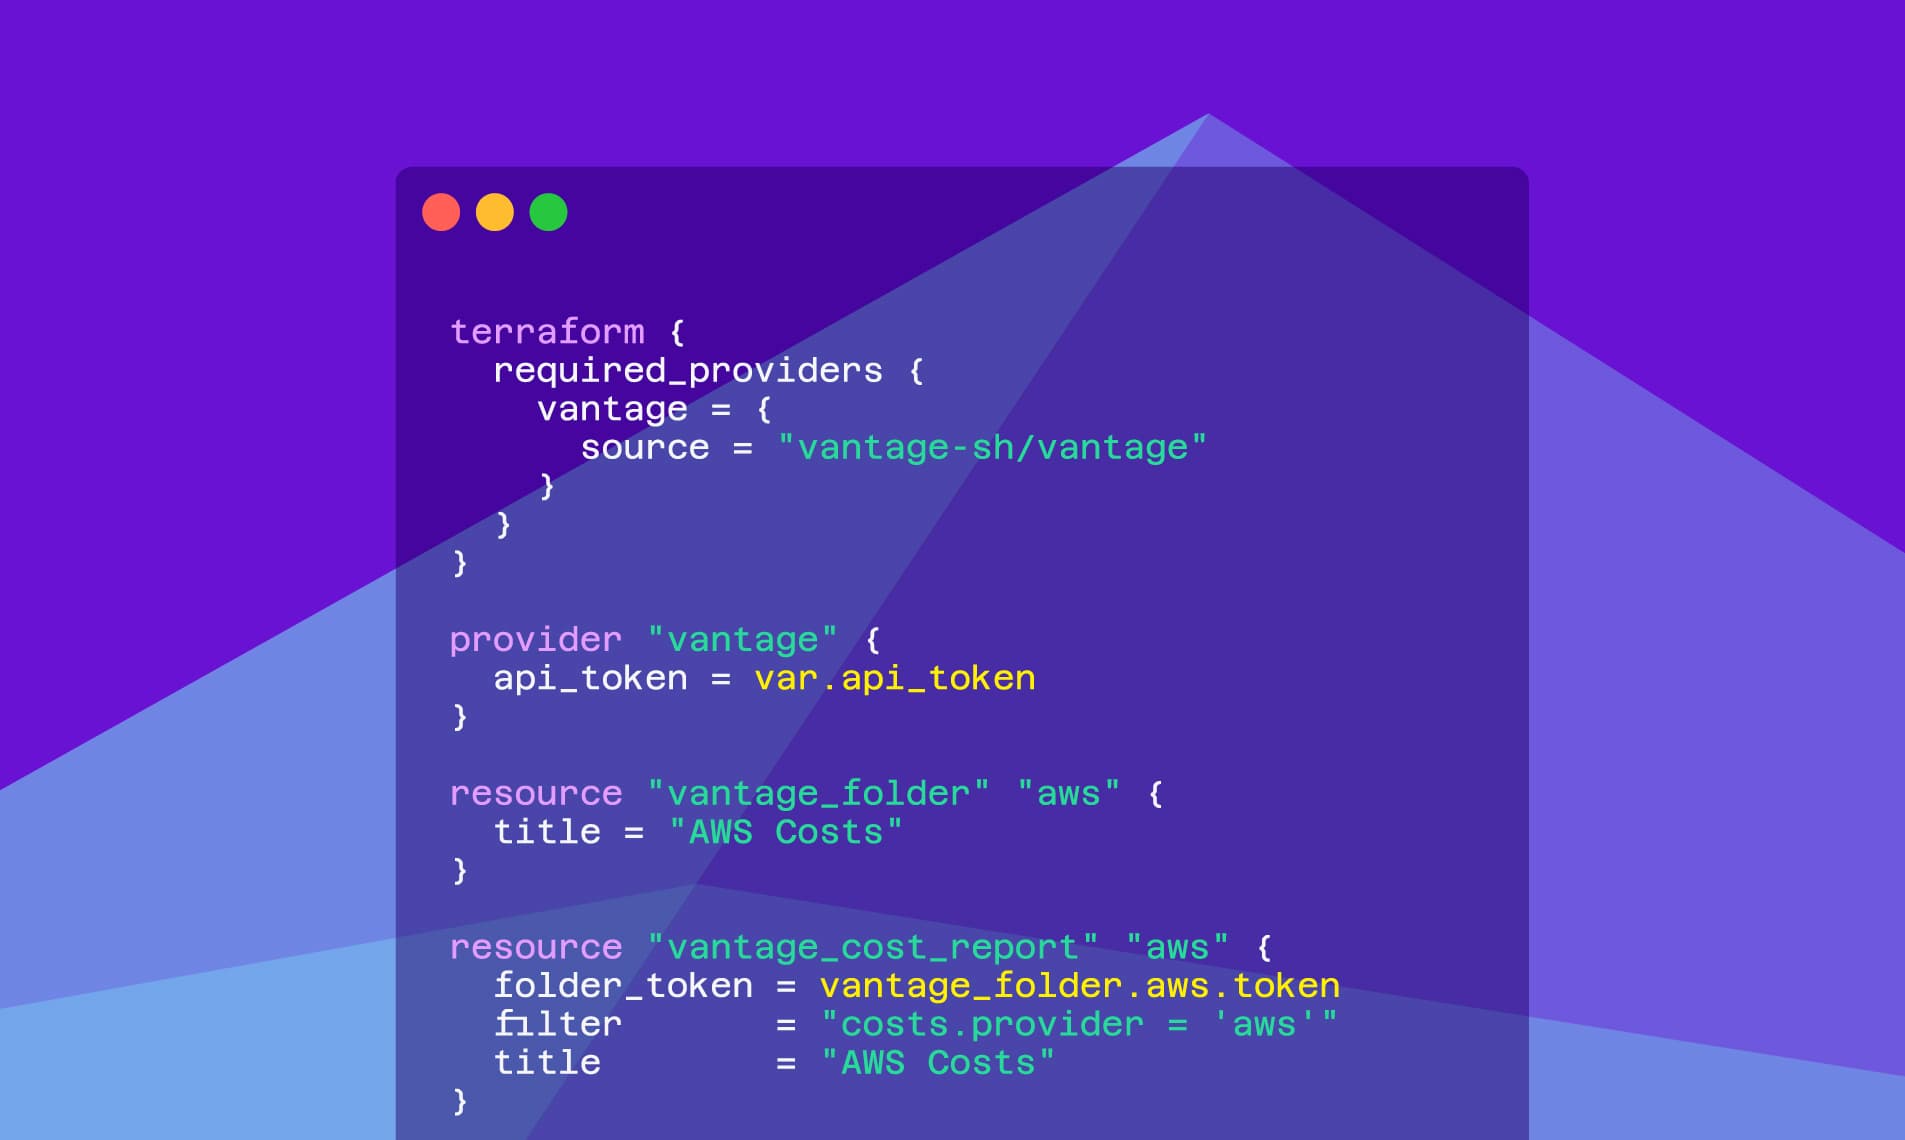
Step 3: Define Terraform Resources, Variables, and Outputs
Next, we'll create a set of Vantage resources in /vantage_modules/main.tf.
We'll use this file as the source when we create our modules. We can then reuse this set of resources across both the AWS and Snowflake modules.
These resources will create a folder, a saved filter, and a Cost Report that uses the saved filter within the Vantage console.
The filter argument of the vantage_saved_filter resource uses Vantage Query Language — or VQL — which is a SQL-like language for creating filters. Once created, the Snowflake filter will look like the below image. The AWS filter will look similar, specifying the AWS provider.
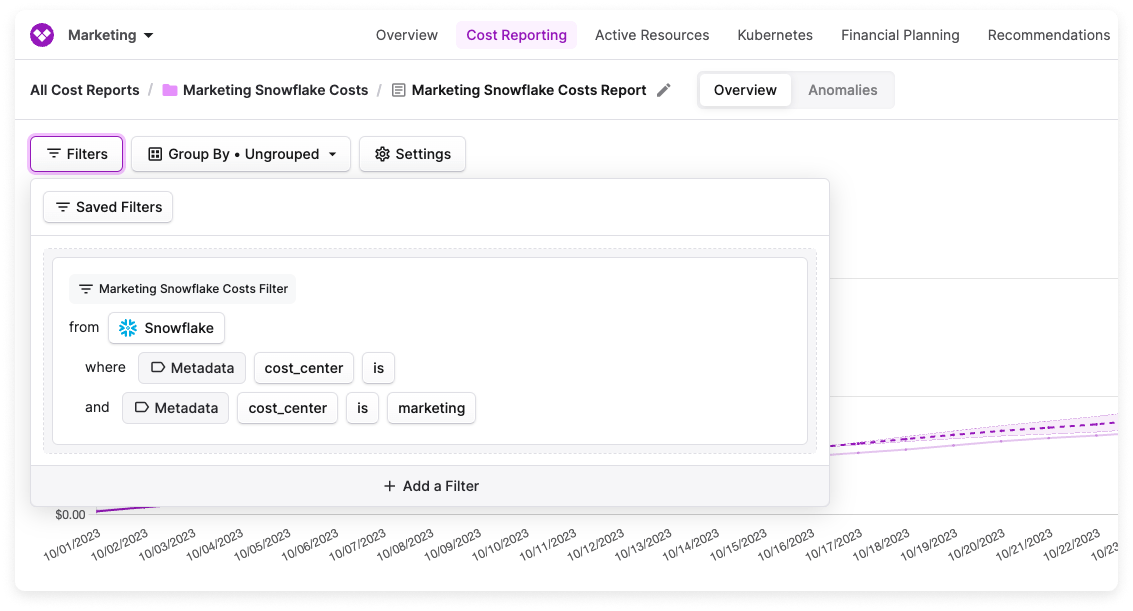
Filter for Snowflake costs created in Terraform.
In this scenario, the value for costs.provider is stored as a variable (var.service), which will be referenced when constructing the modules. These values will be set to aws and snowflake in their respective modules.
Observe the use of variables throughout this configuration (for example, var.tag_value). These variables should be stored in the /vantage_modules/variables.tf file, depicted below.
In addition, the report ID, or token, that is output from the vantage_saved_filter resource needs to be saved to /vantage_modules/outputs.tf. We'll use this token when creating a Cost Report in the vantage_cost_report resource. To create a dashboard that displays a Snowflake and an AWS report, we'll also need to create outputs to obtain the generated token for both Costs Reports.
Once created, the Cost Report will look like the below image. One report will be created for Snowflake costs, and one report will be created for AWS costs.
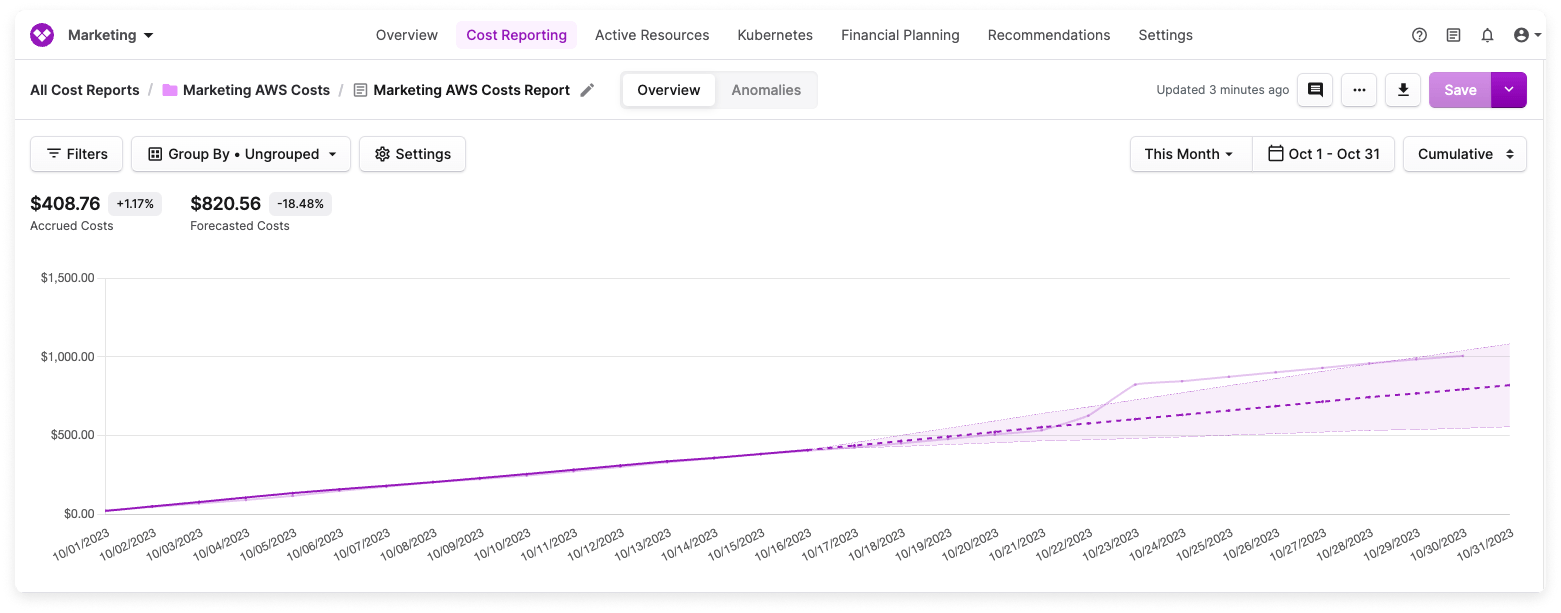
AWS Cost Report created in Terraform.
Step 4: Configure the Root main.tf and Dashboard Terraform Resource
Finally, we'll configure the root main.tf file, which includes both the marketing_aws and marketing_snowflake modules as well as their associated configurations.
Here we will define the arguments specific to each module. For example, the values for the tag_name and tag_value are used in the vantage_saved_filter resource we defined earlier. A best-practice cloud cost strategy includes resource tagging. In this scenario, the Marketing team's cost allocation strategy includes adding cost_center AWS tags and Snowflake metadata to the resources they use.
To bring everything together, we'll create a single dashboard that contains the AWS and Marketing Cost Reports. This dashboard shows costs over the past six months, grouped by month.
After running terraform plan and terraform apply, we now have a fully functioning dashboard that shows both AWS and Snowflake costs attributed to the Marketing team. Per our initial goal, the dashboard shows monthly data for the past six months. We've packaged a set of resources and variables we can use across multiple cloud service providers.
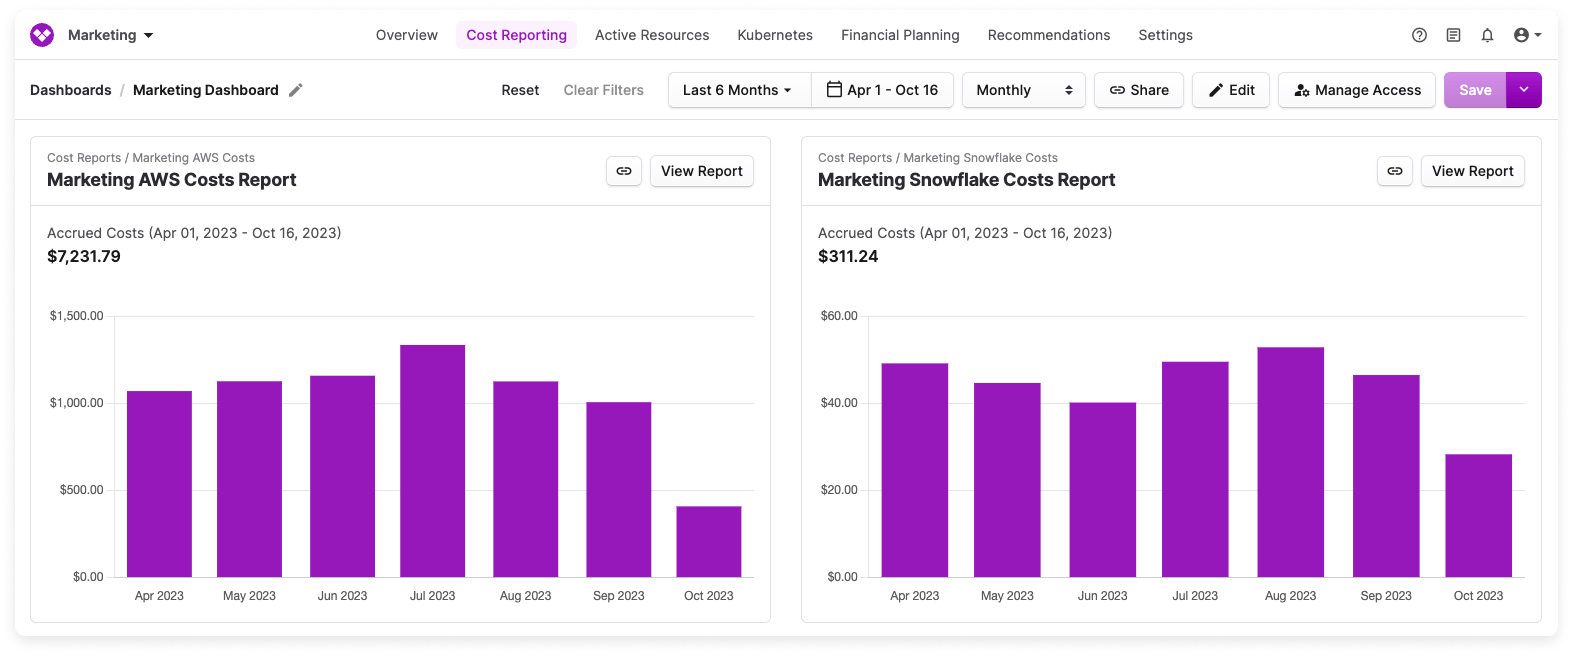
Final dashboard: AWS and Snowflake marketing costs for the past six months, created in Terraform.
Adopting FinOps as Code in Your Organization
FinOps as Code offers a new, more streamlined approach to cloud cost management. It not only addresses the increasing complexity of cloud budgets and resource management but also aligns with traditional software practices, like infrastructure automation and collaboration. As cloud practitioners grapple with multi-cloud deployments and numerous cloud service providers, FinOps as Code can promote financial efficiency.
The tutorial demonstrated a practical application of FinOps Principles using Terraform. Cloud practitioners can easily implement this cost-efficient and collaborative approach. The FinOps as Code mindset will empower teams to take ownership of their cloud usage and ensure accessible and timely financial insights.
Sign up for a free trial.
Get started with tracking your cloud costs.