How Vantage Uses Vantage
We saved 80% on external traffic costs, and 46% on S3, using our own platform.

Being a cloud cost visibility and optimization platform, naturally we’re interested in ways to save on our own cloud costs. To meet our goal of general cloud cost savings, we used our own platform to identify areas for savings, then implemented changes in AWS services and retention rules to lower our cloud bill.
Identifying Areas for Cloud Cost Savings
We began our search for cost savings in a couple places. The first was by looking through our anomalies. Anomalies are automatically detected on every cost category for every service of a Cost Report. We received anomaly notifications that certain service prices were increasing out of scope based on percentage growth. By regularly investigating these anomalies as they come in, we can fix problems and misconfigurations before costs get out of hand.
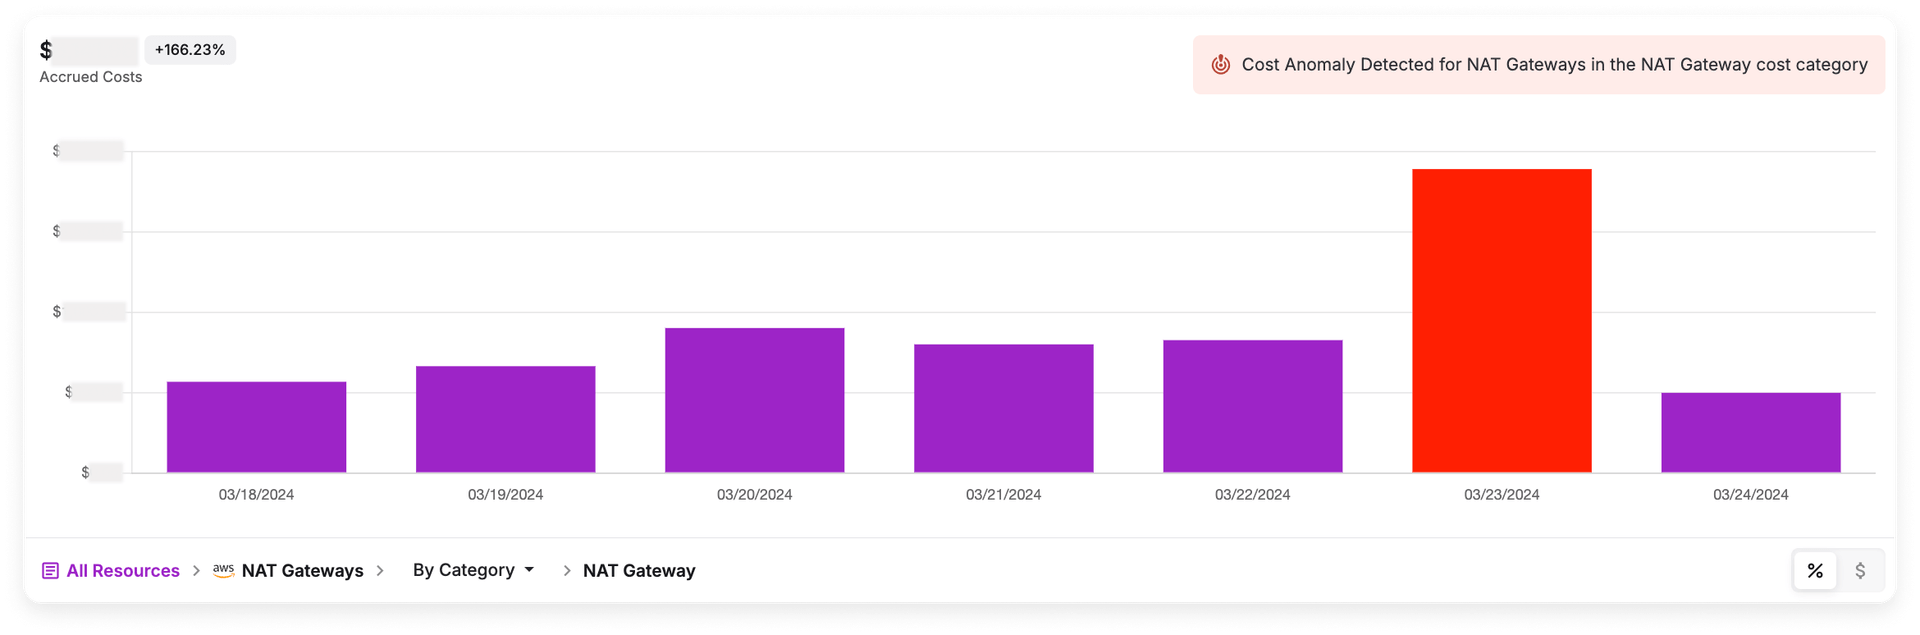
NAT gateway cost anomaly in Vantage
The other way we identified cost saving opportunities was by going into our All Resources Cost Report that shows all costs across all connected services. This report sorts all services across all providers from highest to lowest costs. We identified areas for optimization by looking at the change percentage from the current period to last period. A high change percent could indicate unexpected runaway growth or stale resources and requires further investigation.
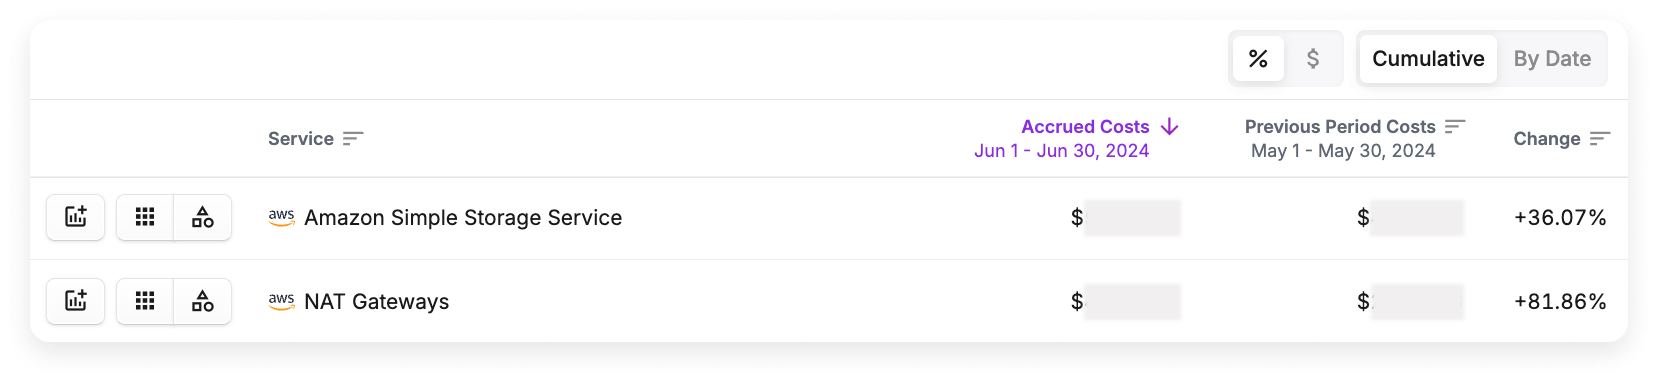
Percentage increase for S3 and NAT gateway in Vantage
How We Saved 80% by Switching NAT Gateways to VPC Endpoints and NAT Instances
NAT gateways allow instances in private subnets to access the internet while keeping those instances secure from inbound traffic. It’s simple to set up and scale, however, one significant downside is that NAT gateways charge for both ingress and egress data. This can become extremely expensive, especially when handling large volumes of data. We were using mostly NAT gateways with a couple of VPC endpoints in our previous approach.
However, using the methods above, we noticed an increase in NAT gateway costs over the span of a few months. Then, the situation escalated from May to June, with our NAT gateway spend increasing by roughly 82%.
To investigate the surge in costs, we analyzed our Network Flow Reports to get a clear view of our traffic patterns. Network Flow Reports are a Vantage feature that allows you to visualize and attribute data transfer charges to specific AWS resources and services outside of AWS (e.g., Datadog). With Network Flow Reports, we were able to view the data flows that were most contributing to the costs.
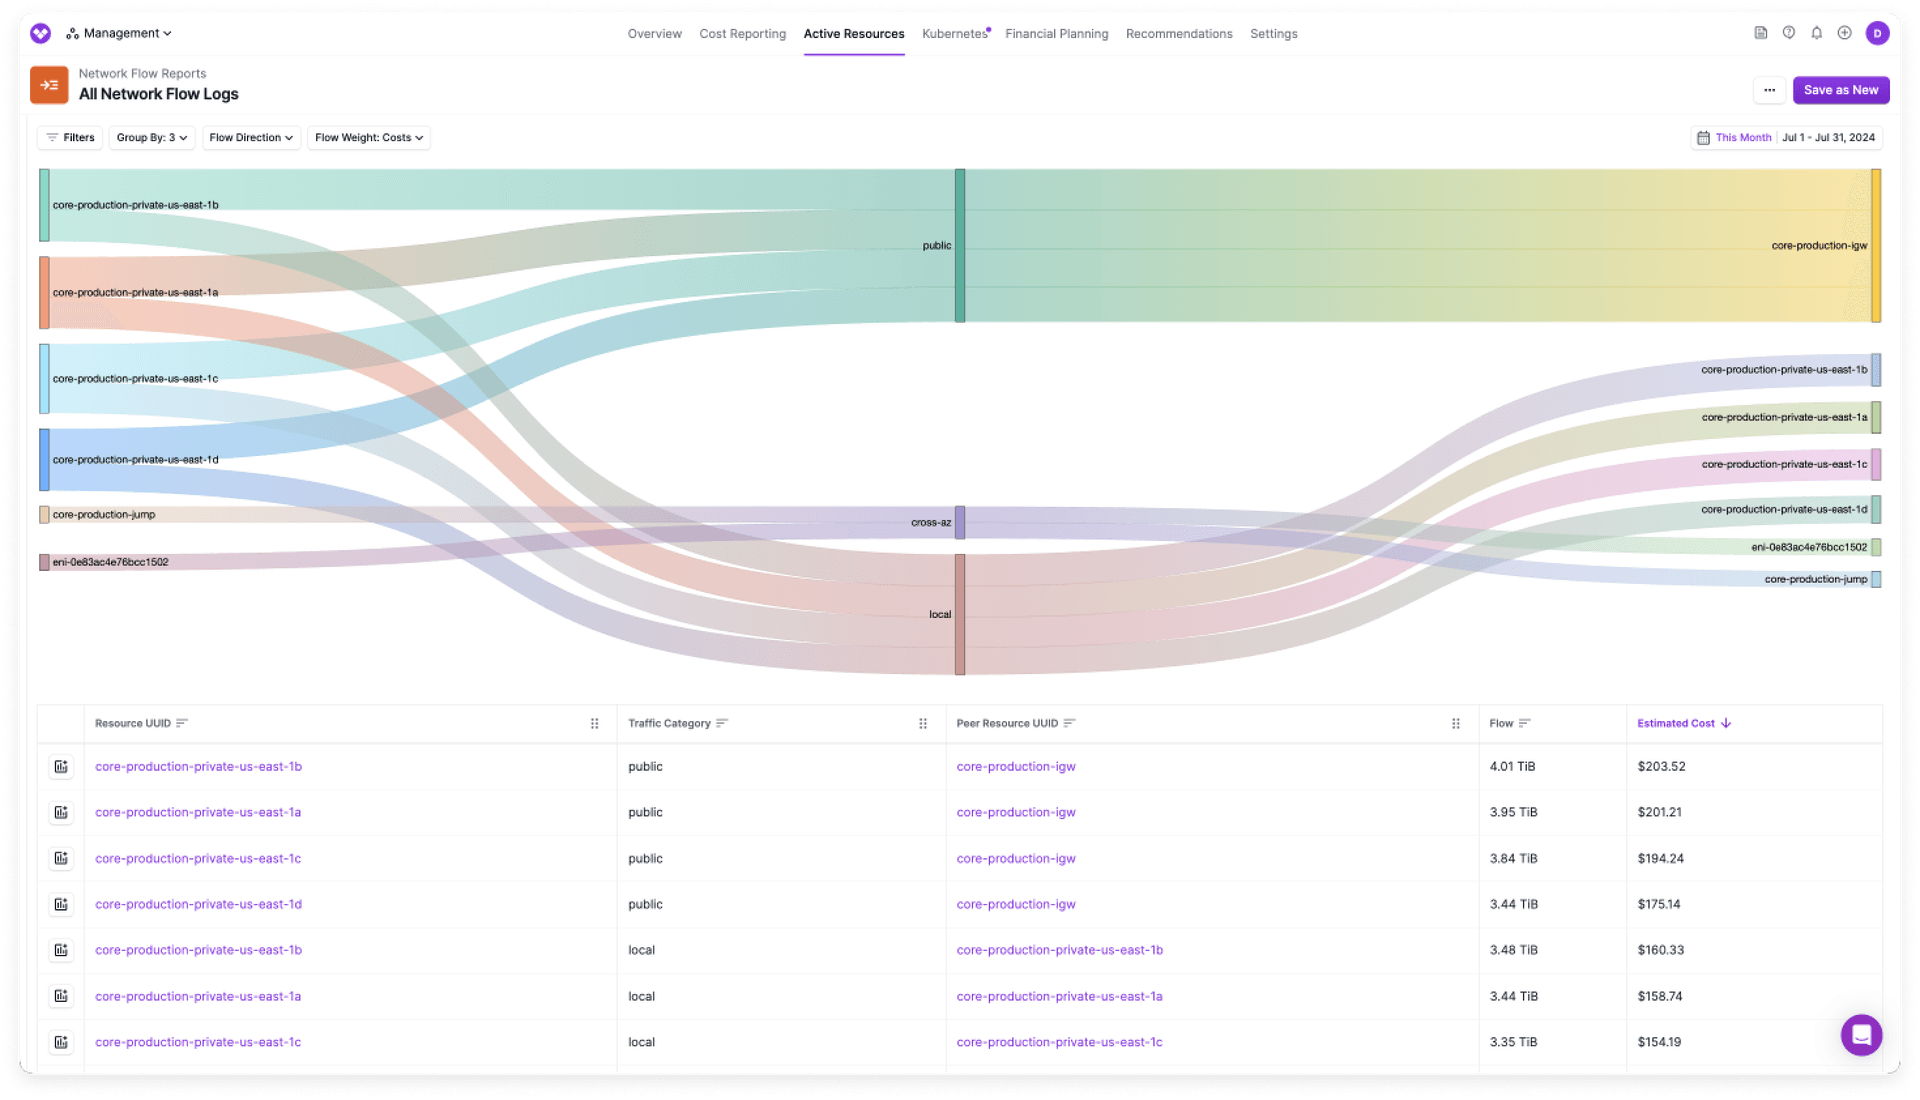
Network Flow Reports with flows from highest to lowest cost
We identified that a significant portion of the expenses was related to ingress data traffic. This was unsurprising because we were using NAT gateways to send large amount of daily requests to our customers cloud providers requesting resources. The response would be floods of data, which with NAT gateways we would pay per GB processed. We also noticed a high volume of egress data being sent to Datadog, a perfect use case for VPC endpoints.
Switching From NAT Gateways to VPC Endpoints and NAT Instances
After using Vantage to identify the cost saving opportunities, we sought out to optimize our external traffic strategy. To do so, we replaced our NAT gateways with NAT instances and additional VPC endpoints.
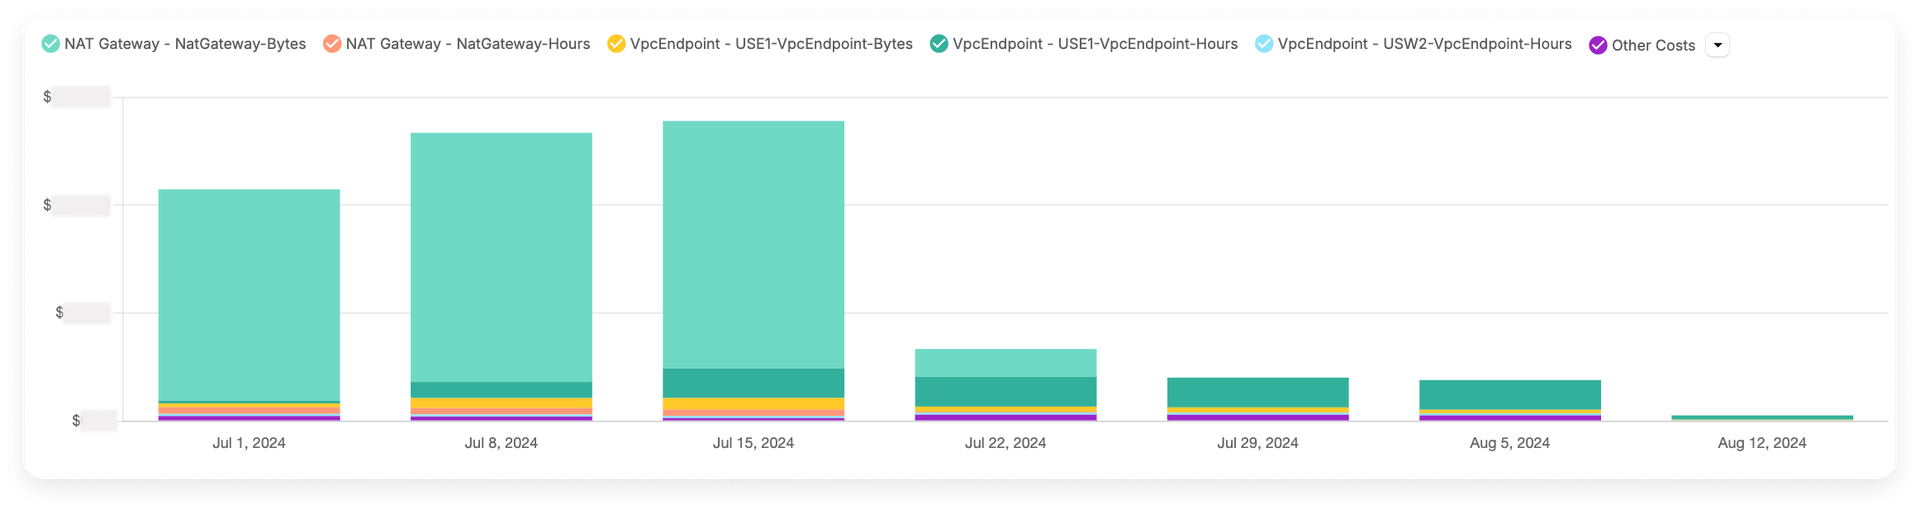
Vantage external traffic costs before and after optimization
VPC endpoints are a feature of AWS PrivateLink that allow you to privately connect your VPC to supported AWS services and third-party services without going through the public internet. As we mentioned in a previous blog, switching from NAT gateways to VPC endpoints can greatly reduce data transfer costs, however, it only is applicable for certain scenarios. Specifically, it requires vendors to provide an AWS endpoint for making requests from your private subnets against their resources within the same AWS region. In our case, Datadog was a large driver of NAT gateway costs and provided a VPC endpoint we could use instead.
For situations where we could not use VPC endpoints, we opted for NAT instances. In most cases, the difference in price of NAT instances and VPC endpoints is negligible. However, VPC endpoints come with better performance and security as they keep traffic within the AWS network, avoiding the public internet altogether. They are also generally easier to set up and manage compared to NAT instances, requiring less operational overhead.
NAT instances are EC2 instances configured to perform NAT for resources in private subnets to allow private resources to access the internet or other AWS services while preventing inbound internet connections. They are charged based on standard EC2 pricing, which includes a fixed hourly rate plus data transfer costs for egress traffic only. By switching to NAT instances, we were able to avoid charges for processing inbound data, which was a significant cost driver in our previous setup. This approach is ideal for use cases with high volumes of ingress traffic that want to minimize costs associated with data transfer. The trade-off is the additional management overhead required to maintain NAT instances, but in our scenario, the cost savings far outweighed this disadvantage.
Runaway S3 Storage and Tiering Costs
When it comes to storage, Amazon S3 is one of those services users often forget they have buckets or files that are no longer needed. S3 is relatively easy to use and without proper measures in place, such as lifecycle rules or appropriate storage class selection, your costs can easily add up. In our quarterly Cloud Cost Reports, we see time and time again that S3 ranks as one of the top services in terms of spend—recently ranking at #3.
Review Overall Monthly S3 Costs
Over the course of the month, we started to notice on our All Resources Cost Report that our S3 costs were significantly increasing. S3 pricing is based on object storage amount, storage class, bandwidth, and request metrics (e.g., GET). Therefore, we had to dig in deeper to see what cost category was driving these increased costs.
We then dug into why we were seeing such excess costs:
- To isolate S3 costs on a Cost Report, select the Amazon Simple Storage Service row in the costs table below the graph.
- To see individual bucket costs, select the Costs by Resource button in the S3 row.
- A list of buckets is displayed. You can sort the table by the Accrued Costs header to see the most expensive bucket. We noted that one bucket in particular accounted for most of our S3 costs—with a 17% increase from the previous period!
- The next step is to look at the specific S3 category contributing to this bucket’s overall costs. Above the costs table, select By Category. Listed below the table are categories, like Storage, API Request, etc. One potential contributor to high S3 costs can be excessive API requests, which can be due to many reasons, including something as alarming as excessive unauthorized requests. Luckily, this was not the case for us. In our case, Storage was the highest category.
Review Individual Active Resources
Another helpful view we consulted in Vantage was the Active Resources overview. An active resource is a resource, such as a virtual machine—or in this case, an S3 bucket—that is currently generating costs within a cloud account. You can access this screen a few different ways, but from any Cost Report, select the individual resource from the costs table and the Active Resources screen is displayed with a set of metadata for that resource. For this particular bucket, we could see the storage size was over 500 TB by the end of the month!
Within this same screen, Vantage provides an in-depth storage summary that goes over options for potentially moving to different tiers via Intelligent-Tiering. S3 Intelligent-Tiering is an S3 storage class that will automatically optimize storage costs on your behalf. It monitors access patterns of S3 objects and shifts them between different storage classes to help you save. Often, many users have files stored in S3 Standard storage, but they may not think to ever optimize these costs and therefore overpay for the number of files they're storing in S3. Vantage shows you a potential monthly savings for using various S3 Intelligent-Tiering options.
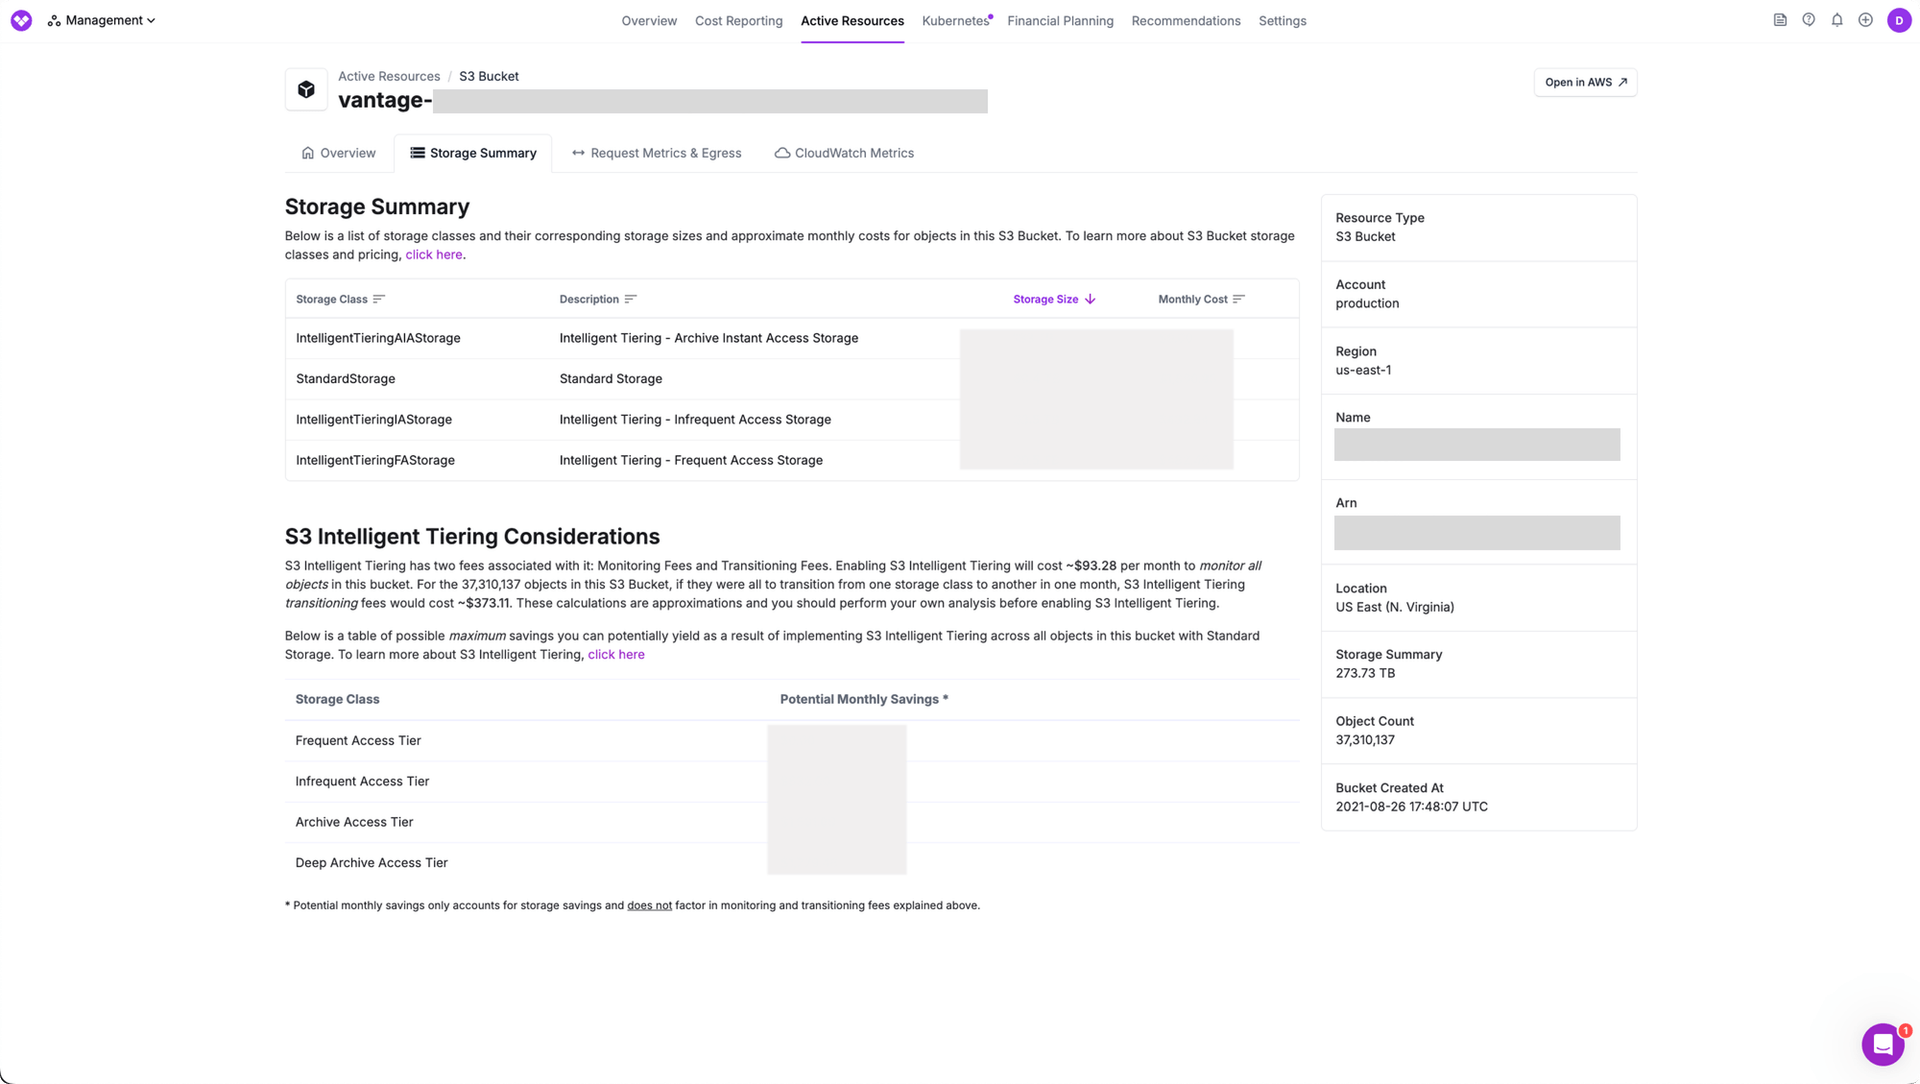
Storage Summary for a specific S3 bucket
From all this analysis in Vantage, we saw that the storage costs for this particular resource were by far the highest and increasing.
Implement Solutions
We had to first understand what specifically was driving this increase, which would determine our resolution strategy. After reviewing our analysis from Vantage with our Infra team, we were able to determine (with some additional help from Amazon S3 Storage Lens, described next) the majority of files were temporary (ETL intermediary files) that do not land in our database. This meant that the best solution was to do some data cleanup. We talked about what files were actually needed and what files could be instead dumped after a certain period of time. We also considered different tiering options and implemented the following solutions.
Use Amazon S3 Storage Lens
We first decided to implement Amazon S3 Storage Lens. This feature provides visibility into your storage usage and activity trends, helping you optimize costs. Storage Lens also provides recommendations for optimization. Since it's relatively inexpensive to enable (up to 25B objects monitored costs $0.20 per million objects monitored per month), we turned it on. With these additional insights, we identified the top three bucket prefixes and found that certain segments were rapidly growing. We were able to confirm internally it was temp data and set up a lifecycle rule (described next) to cover this.
Implement Lifecycle Rules
Next, we set up storage lifecycle rules. Lifecycle rules automatically manage the lifecycle of objects in your buckets by transitioning them between storage classes or expiring them after a certain period. Another benefit is that lifecycle rules require no application codes changes—in other words—no additional developer time. We set up the following rules:
- For our temp files, we set a rule to expire them after 7 days, with the objects being permanently deleted three days later. This provides a recovery window in case of failure or error, while ultimately removing the unneeded data. This action cut our storage usage in half, and our costs have remained stable since this time.
- We also set up a tiering rule for other files. After 30 days, these files are moved to Intelligent-Tiering, which is cheaper but slower to retrieve, which helps to optimize our costs without sacrificing access when needed.
Conclusion
We consistently rely on Vantage Cost Reports and anomaly detection tools, which help us to identify issues with resources, like S3 buckets and NAT gateways. As we heavily promote creating a culture of cloud cost optimization in your organization, it’s only natural that we also rely on our own app to save internally. Overall, Vantage accelerates the cost investigation process, proving that Vantage is as important to our own cloud cost management strategy as it is to our customers' strategies.
Sign up for a free trial.
Get started with tracking your cloud costs.