Optimize AWS Fargate Costs
You can easily overpay on Fargate without proper monitoring and resource allocation. Optimize your Fargate costs while maintaining performance and scalability.

Customers use AWS Fargate for (arguably) the simplest way to run containers at AWS. It abstracts away the underlying infrastructure, allowing developers to focus solely on their applications. Since it doesn't require much configuration, it's often set up and not revisited, and companies end up overpaying. Whether you’re starting with Fargate or looking to optimize your existing setup, the following cost-optimization strategies will enable you to minimize expenses.
Fargate Pricing Recap
Fargate is useful because it abstracts the complexities of infrastructure management and leaves teams to focus solely on their containerized applications. Pricing is relatively predictable since you are charged for the resources you allocate, instead of what you consume. We have an in-depth article complete with pricing examples here, but to recap—you are charged for CPU and GB of RAM based on the operating system, CPU architecture, and storage resources consumed for a Task or Pod.
Fargate Cost Optimization Strategies
Using combinations of the applicable recommendations can significantly lower costs or help you start off on the right foot with your Fargate deployments.
Right Sizing Fargate Tasks Using AWS Compute Optimizer
Over-provisioning your Fargate tasks, just like over-provisioning your EC2 instances, leads to unnecessary spend for resources you don’t consume. For existing Fargate tasks, AWS recommends using AWS Compute Optimizer to identify over-provisioned tasks and their potential savings.
Compute Optimizer is not automatically enabled, so the first step to using this feature is opting in, either in the Compute Optimizer console or through the AWS CLI, Compute Optimizer API, or SDKs. The CLI command for opting in for your individual account is:
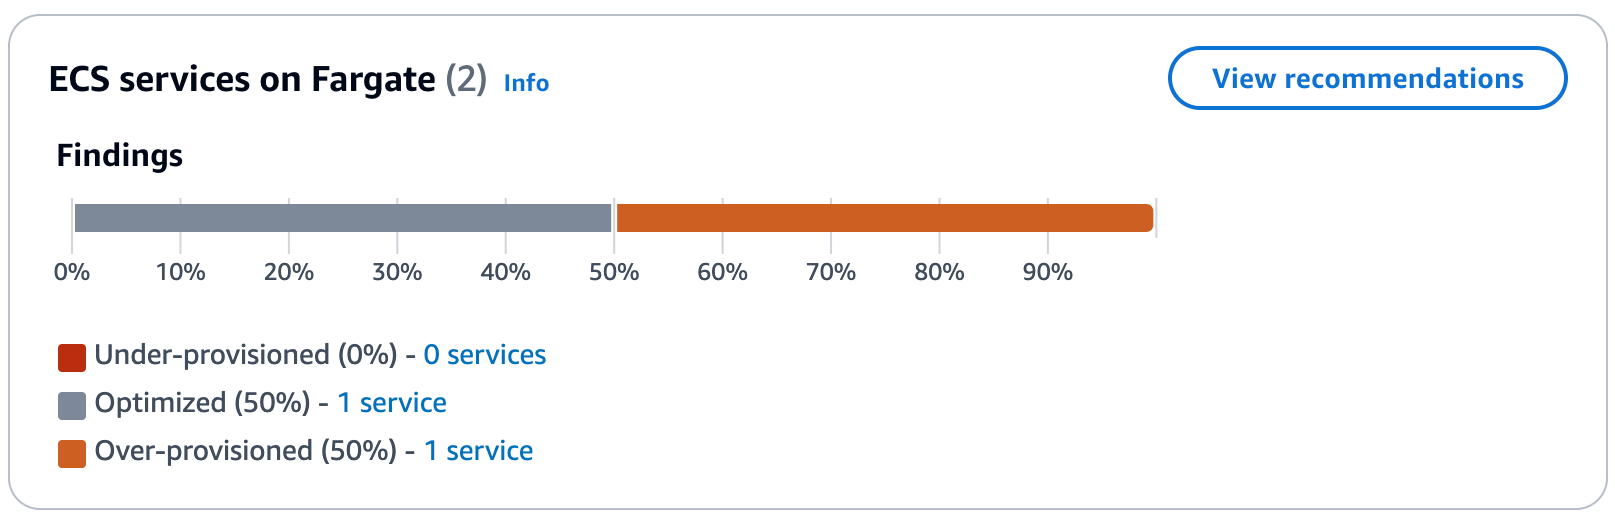
AWS Compute Optimizer recommendations dashboard for AWS Fargate
Once enabled, you can see the generated recommendations through the Compute Optimizer console or the CLI. In the console, select "ECS services on Fargate" and filter by Findings equal to "Over-provisioned." Alternatively, use the following CLI command:
After you've identified over-provisioned tasks, consider the potential cost savings and the performance risk to determine if it's appropriate to right size. You can implement right sizing in the ECS console or CLI. In the ECS console, simply create a new task definition with the CPU and memory specifications recommended by Compute Optimizer, and then replace your current task definition in your Amazon ECS service.
The implementation is the same in the CLI, with the following two commands
When implementing right sizing recommendations, or for new Fargate tasks, AWS recommends load testing and it's important to test the configurations in a non-production environment first. Then, after deploying to production, to monitor your application's performance to ensure the configuration is sufficient.
Auto Scaling Fargate Tasks
While right sizing helps optimize your baseline resource allocation, Auto Scaling allows your Fargate tasks to dynamically adjust to changing demand. This ensures you're not overpaying during periods of low activity while still having the capacity to handle traffic spikes. At the same time, scaling unnecessarily can lead to overspending, so it’s important to monitor your scaling configurations closely.
To implement Auto Scaling, first you must register your ECS service as a scalable target through the either ECS console (it automatically registers when you configure Auto Scaling), with the SDKs (with the RegisterScalableTarget operation), or with the following CLI command:
Next, determine the type of scaling from the following options:
AWS Auto Scaling types
If applicable, determine the metric on which to base your scaling. Use CloudWatch or Container Insights to analyze the average metrics of your services. Similar to right sizing, it is best to load test in a non-production environment first.
Finally, create the scaling policy by defining your scaling actions and linking them to the selected scaling type. You can do this using the console, SDKs, or the CLI. is an example for Target Tracking through the CLI:
The content of the file for a Target Tracking policy based on CPU utilization would look something like this:
As with right sizing, continue monitoring to ensure scaling is not leading to unnecessary costs, especially as the behavior changes over time.
Leveraging Fargate Spot and/or Savings Plans
Fargate offers two options discounted pricing: Fargate Spot and Savings Plans.
Fargate Spot allows you to save up to 70% compared to On-Demand pricing. However, there are trade-offs: capacity is not guaranteed, and you receive only a two-minute warning before task termination. Also, prices are subject to change based on market conditions. Therefore it is best suited for fault-tolerant applications that can handle potential interruptions, such as batch processing jobs or stateless applications with built-in resilience. For detailed instructions on utilizing Fargate Spot, refer to the AWS guide.
On the other hand, Savings Plans offer a way to reduce costs by committing to a consistent amount of usage over a 1- or 3-year term, potentially saving you up to 50%. These are particularly beneficial for workloads with predictable, steady-state usage. A notable advantage is that Savings Plans can be applied across other AWS services (e.g., EC2), providing added flexibility.

Vantage automatically provides Savings Plans recommendations for AWS Fargate
Use Graviton Processors for Fargate
With Fargate, choosing ARM-based Graviton processors can offer up to 20% lower costs compared to corresponding Intel x86-based processors. The drawback is a potentially tedious migration effort because you need to determine if it is compatible with your workload and possibly rebuild your container images for the ARM architecture.
Some things to review are your application code, dependencies, programming language, runtime support, and any third-party libraries or tools for incompatibilities. The good news is that as Graviton has grown in popularity, it has become increasingly supported with most popular software packages now offering ARM64 versions.
Once you've assessed your application's compatibility and addressed any potential issues, Docker Buildx is a useful tool for if you need to implement a multi-architecture build. This resource goes more in-depth.
Once you’ve tested and are sure of compatibility, to use Graviton processors with your Fargate tasks, you need to specify the CPU architecture in your task definition:
Region Selection and Data Transfer
An often overlooked pricing factor is region selection and its relationship with data transfer. Selecting a region is a careful balance; while some regions may offer significantly lower costs, the feasibility of that choice depends on the distance to your user base and the potential for increased data transfer fees. We wrote an in-depth blog on saving on AWS Data Transfer here, which provides more detailed strategies for optimizing your data transfer costs across different regions.
When to Use EC2 Instead of Fargate
Self-managed EC2 is an alternative to Fargate that yields cheaper costs at the equivalent compute. It also comes with the bonus of being able to select the EC2 instance of your choice. The obvious drawback is the increased operational time. For normalized compute patterns the operational effort may be worth it for the money saved. In a previous blog we wrote, we compared pricing of equivalent Fargate and EC2 configurations and found Fargate was roughly 16%, 21%, and 40% more expensive than EC2.
Conclusion
Optimizing costs for AWS Fargate is an ongoing process that requires a combination of strategies and continuous monitoring. Using a combination of applicable best practices, you can significantly reduce your Fargate expenses without compromising performance or reliability.
Sign up for a free trial.
Get started with tracking your cloud costs.